How to Connect Window Host PC (Win 10) with GNS3
Updated:
How to Connect Windows Host PC with Your Device in GNS3
In this tutorial, I’m teaching you how to connect GNS3 topology with your Windows host machine. We are using a Microsoft loopback adapter for this lab which simplifies the management of network devices in GNS3. The required steps for this lab is described below:
- GNS3 and VMware
- Download the PuTTY.exe file.
- Install Microsoft loopback adapter and GNS3 configuration.
- Configuration of the network device.
- Configuration of windows defender firewall.
Install the Microsoft loopback adapter
- Right-click on the window start menu icon and select Device Manager. The device manager window will immediately open (or you may use any other way how to open the device manager window)
- Click on Action, and select Add legacy hardware
- SClick Next on the welcome screen
- Choose “Install the hardware that I manually select from a list” and click on Next
- Scroll down and select Network adapters from offered common hardware types and click on Next
- Select Microsoft as the manufacturer, and then select Microsoft KM-TEST Loopback adapter card model, click on Next
- Click on Next
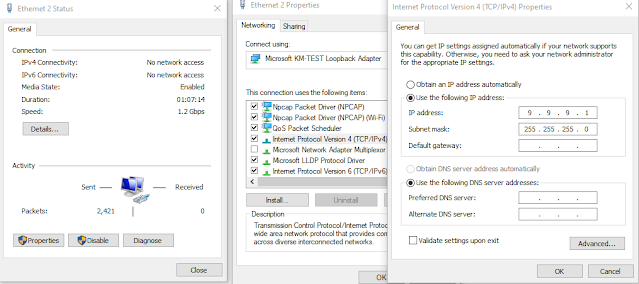
- Click on Finish and identify your loopback adaptor, in my case Ethernet2 as shown below:

Configuration of GNS3 and network device
Start GNS3 and drop a cloud node at the workspace and configure as below:
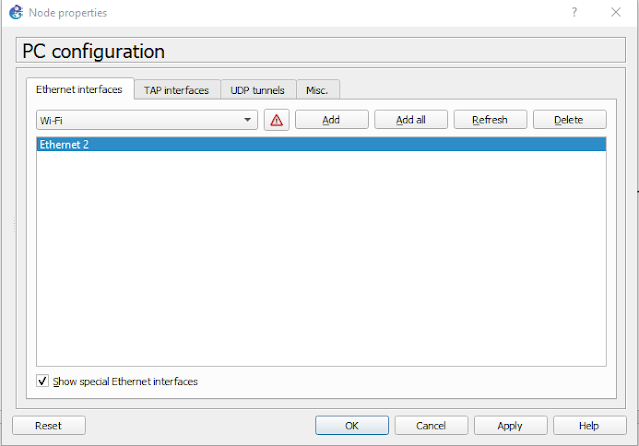
- Right-click Cloud node, select Configure, and then select “Show special Ethernet interfaces.”
- Add the Ethernet2 from the drop-down menu.
- Delete any other interfaces.
- Highlight the Ethernet2
- Click on add button.
- Apply ok.
- Change the symbol to a computer and rename cloud node to PC.

Configure Ethernet2 adaptor from opening windows Network and Sharing Centre then change adopter setting and add static IP address as above. The IP address used in this example is only for the lab.

Add switch and router as below:

- Switch1 is optional and required no configuration.
- Configure SW1 as below:
conf t
!
hostname SW1
!
enable secret cisco
service password-encryption
!
username admin password cisco
!
no ip domain-lookup
!
interface Vlan1
 ip address 9.9.9.2 255.255.255.0
 no shutdown
!
line vty 0 4
 logging synchronous
 login local
 transport input all
!
end
!
wr
Also configure router in same network.
Configuration of windows defender firewall
- Open cmd.exe and check connectivity with ping, hope all is well.
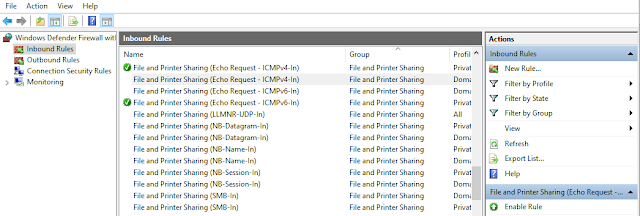
- You can open the Windows Defender firewall as shown.
- Open Windows defender firewall with Advanced Security and enable these two settings on the inbound rules as below:

- File and Printer Sharing (Echo Request – ICMPv4-In) Private
- File and Printer Sharing (Echo Request – ICMPv6-In) Private
This will allows GNS3 to send back ICMP (ping) request to the host PC.
Comments