Part 03: Docker for Network Automation
Updated:
Automation with Docker
It was far easier to learn how to use Docker than to dive into all the details of an application. Using Docker allows you to leverage pre-built, ready-to-use container images. If an application consists of multiple components (i.e. a database, a front-end and a back-end) you can deploy multiple containers and link them.
The subject of this post is building custom containers to leverage some network automation tools like Nornir, Ansible, and Netmiko. Because a lot of these tools are built on Python and meant to run in a Linux environment, you can get into dependency hell very quickly. By isolating your tools in a container, this problem can be circumvented.
The instructions to build a working Docker environment can be found here..
Build Your Automation Container
It is also possible to build your own container. You can use containers from Docker Hub as a base for your own container. The following example will extend a Docker Python image. To start, make a fresh directory and place two empty files with the following names in it:
$ tree
.
├── app.py
└── Dockerfile

0 directories, 2 files
The file app.py is a Python netmiko script, that will be put into the new container image. In my case, the contents of the file look like this:
from netmiko import ConnectHandler

# Create a dictionary for a particular Device
R1 = {'device_type': 'cisco_ios',
      'ip': '172.17.0.10',
      'username': 'admin',
      'password': 'cisco'
}

'''calling the ConnectHandler Library [**R1] means telling python to consider
the contents of the dictionary as key-value pairs instead of single elements.'''

net_connect = ConnectHandler(**R1)

# Sending a command in to the Device --->
output = net_connect.send_command("show ip int br")
print(output)
Dockerfile
You can of course add any script you want. Next, we need to write the Dockerfile. The Dockerfile should contain the actual build instructions. My Dockerfile looks like this:
### -------------------------------------------------
# Use an official Python runtime as a parent image
### -------------------------------------------------
FROM python:slim-bullseye

### -------------------------------------------------
### Metadata information
### -------------------------------------------------
LABEL name="Python Automation"
LABEL maintainer="sydasif78@gmail.com"

### -------------------------------------------------
### Update Setup
### -------------------------------------------------
RUN apt update

### -------------------------------------------------
### Install pip and netmiko
### -------------------------------------------------
RUN pip install --upgrade pip \
&& pip install netmiko

### -------------------------------------------------
### Set the working directory to /home
### -------------------------------------------------
WORKDIR /home

### -------------------------------------------------
# Copy the app.py into the container home dir
### -------------------------------------------------
COPY app.py /home
Let’s walk through the Dockerfile:
- The “FROM” statement loads the container we are going to extend
- The “LABEL” statement sets your information (optional).
- The “RUN” statement executes a command in the container.
- The “WORKDIR” statement. When building a container, the default directory WORKDIR in your Dockerfile.
- The “COPY” statement copies the contents of the current directory on the host system to the specified directory in the Docker container.
- If there is two “WORKDIR” statement in the script, the default directory you start in will be the last WORKDIR in your Dockerfile.
Docker build procedure
Now the only thing left to do is to build the image. In this case, the command syntax is the following:
$ docker build -f ./Dockerfile -t automation .
Sending build context to Docker daemon   5.12kB
Step 1/7 : FROM python:slim-bullseye
 ---> ba94a8d11761
Step 2/7 : LABEL name="Python Automation"
 ---> Running in a1fdac956da5
Removing intermediate container a1fdac956da5
 ---> 39c9f41b8be5
Step 3/7 : LABEL maintainer="sydasif78@gmail.com"
 ---> Running in 7ee29428c026
Removing intermediate container 7ee29428c026
 ---> 6403453cadc6
The “docker build” part is self-explanatory. After that, we have to reference the Dockerfile we’ve created. The “-t automation” part sets the image name. The dot at the end is mandatory because “docker build” expects a path. In this case, the command is run straight from the folder containing the Dockerfile, so we can just add a dot. When we run this command, Docker will first grab the Python base image from Docker Hub. This image is then started as a new container, in which the instructions from the Dockerfile are performed. After these instructions, the Python container now holds the changes and will be saved as a new image, ready for use. When the build command finishes, you should have both the Python image and your new custom image in the local repo:
$ docker image ls
REPOSITORY   TAG             IMAGE ID       CREATED         SIZE
automation   latest          828154ade6ae   6 seconds ago   199MB
python       slim-bullseye   ba94a8d11761   3 days ago      125MB
We can connect to the container by using this command:
$ docker run --name netmiko -it automation bash
root@daf6ab851974:/home# ls
app.py
root@daf6ab851974:/home# cat app.py
from netmiko import ConnectHandler

# Create a dictionary for a particular Device
R1 = {'device_type': 'cisco_ios',
      'ip': '172.17.0.10',
      'username': 'admin',
      'password': 'cisco'
}

'''calling the ConnectHandler Library [**R1] means telling python to consider
the contents of the dictionary as key-value pairs instead of single elements.'''

net_connect = ConnectHandler(**R1)

# Sending a command in to the Device --->
output = net_connect.send_command("show ip int br")
print(output)
root@daf6ab851974:/home#
The command above connects us to a bash shell at /home inside the container. In this environment, all the tools that were installed during the build process are available to us. To leave the container type exit command will disconnect and shutdown the container.
We can connect to the container again by using this command:
$ docker start netmiko
netmiko
$ docker exec -it netmiko /bin/bash
root@daf6ab851974:/home# exit
exit
We, now know some basics about working with Docker. You should also have a functional container that’s usable for your network automation projects. However, needing to connect to the shell of the container might not be the most practical way to run.
Automation lab With Docker
In this section, we will connect our container to a network in GNS3 to test our created docker container but first we will create our lab in GNS3.
Lab Setup
We will create simple network topology in GNS3 as below:
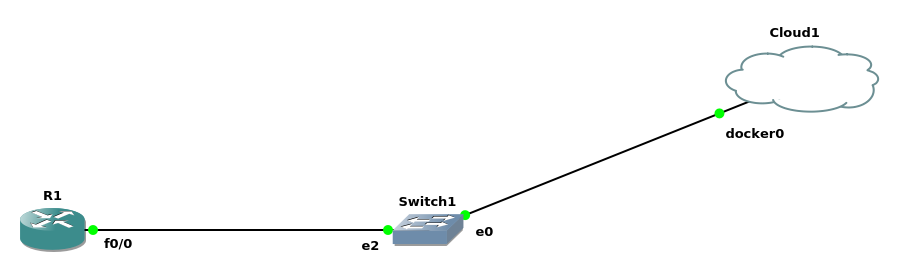
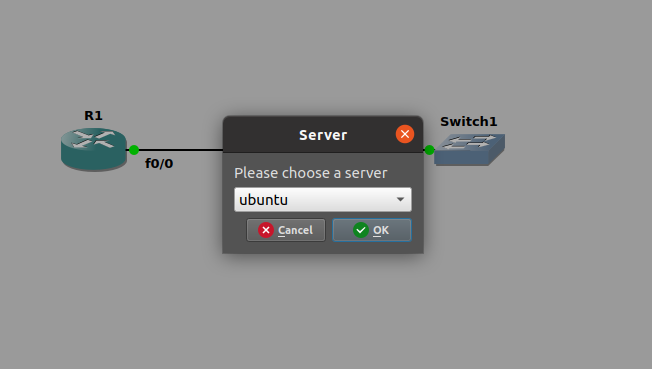
- Open GNS3 and add a cisco router and switch.
- Add cloud to your topology, but make sure to chose your host server, not GNS3VM as below:
After that, double click on cloud node to configure docker0 interface:
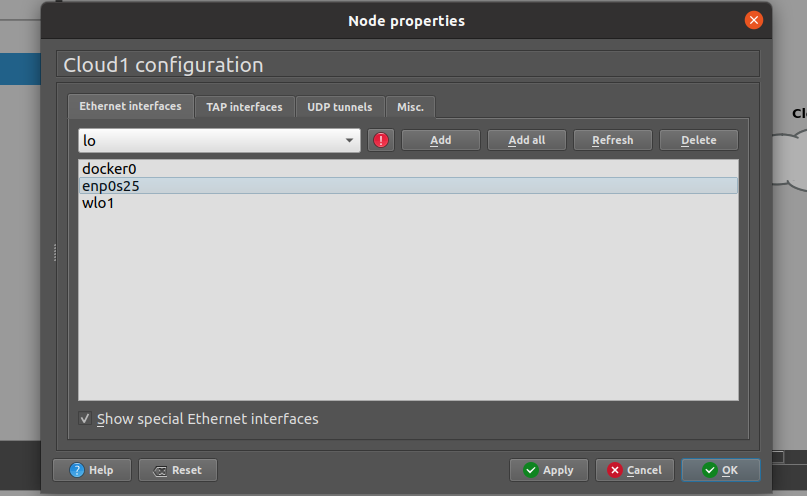
In above configuration tab check show special ethernet interface, select docker0 from dropdown menu click add, apply and ok.
Router configuration
Configure router as below:
conf t
!
hostname R1
!
enable secret 5 $1$NS47$q9v1kBxcavk6vCzCGNmTH1
!
no ip domain lookup
ip domain name tech.com
!
username admin privilege 15 password 0 cisco
!
interface FastEthernet0/0
 ip address 172.17.0.10 255.255.0.0
 duplex auto
 speed auto
!
line vty 0 4
 logging synchronous
 login local
!
!
end
We configure router interface in the same subnet as our docker0 bridge at our host machine as below:
╭─$ ~
╰─➤  ip addr show | grep docker0
docker0: <BROADCAST,MULTICAST,UP,LOWER_UP> mtu 1500 qdisc noqueue state UP group default
    inet 172.17.0.1/16 brd 172.17.255.255 scope global docker0
If you want to learn more about how Docker network is working see Part-02.
Testing Python script
In this step we test our already created container to run our script as below:
- Start container.
╭─$ ~
╰─➤  docker start netmiko
netmiko
- Run Python script.
╭─$ ~
╰─➤  docker exec -it netmiko python app.py
Interface                  IP-Address      OK? Method Status                Protocol
FastEthernet0/0            172.17.0.10     YES NVRAM  up                    up
FastEthernet0/1            unassigned      YES NVRAM  administratively down down
- stop the container.
╭─$ ~
╰─➤  docker stop netmiko
netmiko
- remove the containers.
╭─syd@ubuntu ~
╰─➤  docker rm netmiko
netmiko
That’s it, we run our script successfully in lab environment.
Comments